

This lesson builds one complete, real feature end to end: a chat widget that can be embedded in any website, backed by an AI model through the OpenAI API. No framework required — just HTML, CSS, and JavaScript.
A toggle button, a chat window, a message area, and an input box:
<button id="chatToggle" onclick="toggleChat()">Chat with AI</button>

<div id="chatWindow" class="hidden">
  <div id="chatHeader">
    <span>AI Assistant</span>
    <button onclick="toggleChat()">✕</button>
  </div>
  <div id="chatMessages">
    <div class="msg bot">Hello! How can I help you today?</div>
  </div>
  <div id="chatInput">
    <input type="text" id="userInput" placeholder="Type your message..."
           onkeypress="if(event.key==='Enter') sendMessage()">
    <button onclick="sendMessage()">Send</button>
  </div>
</div>This function sends the user's message to the AI model and displays the reply, keeping track of the conversation so the AI has context for follow-up questions:
const SYSTEM_PROMPT = `You are a helpful customer service assistant.
Answer questions about our courses, fees, and timings. If you don't
know something, say you'll connect the user with a staff member.
Keep responses under 100 words.`;

let messageHistory = [{ role: "system", content: SYSTEM_PROMPT }];

async function sendMessage() {
  const input = document.getElementById('userInput');
  const userText = input.value.trim();
  if (!userText) return;

  addMessage(userText, 'user');
  messageHistory.push({ role: "user", content: userText });
  input.value = '';
  addMessage('...', 'bot');

  const response = await fetch('/api/chat', {
    method: 'POST',
    headers: { 'Content-Type': 'application/json' },
    body: JSON.stringify({ messages: messageHistory })
  });

  const data = await response.json();
  removeTypingIndicator();

  if (data.reply) {
    addMessage(data.reply, 'bot');
    messageHistory.push({ role: "assistant", content: data.reply });
  } else {
    addMessage('Sorry, I had trouble responding. Please try again.', 'bot');
  }
}
Notice this version calls /api/chat on your own server — not OpenAI directly. That's deliberate, and it's the single most important lesson in this entire walkthrough.
Critical Security Mistake — Never Do This
Putting your AI provider's API key directly in frontend JavaScript means anyone who views the page source can steal it and run up charges on your account. This is one of the most common mistakes beginners make, and it is completely avoidable.
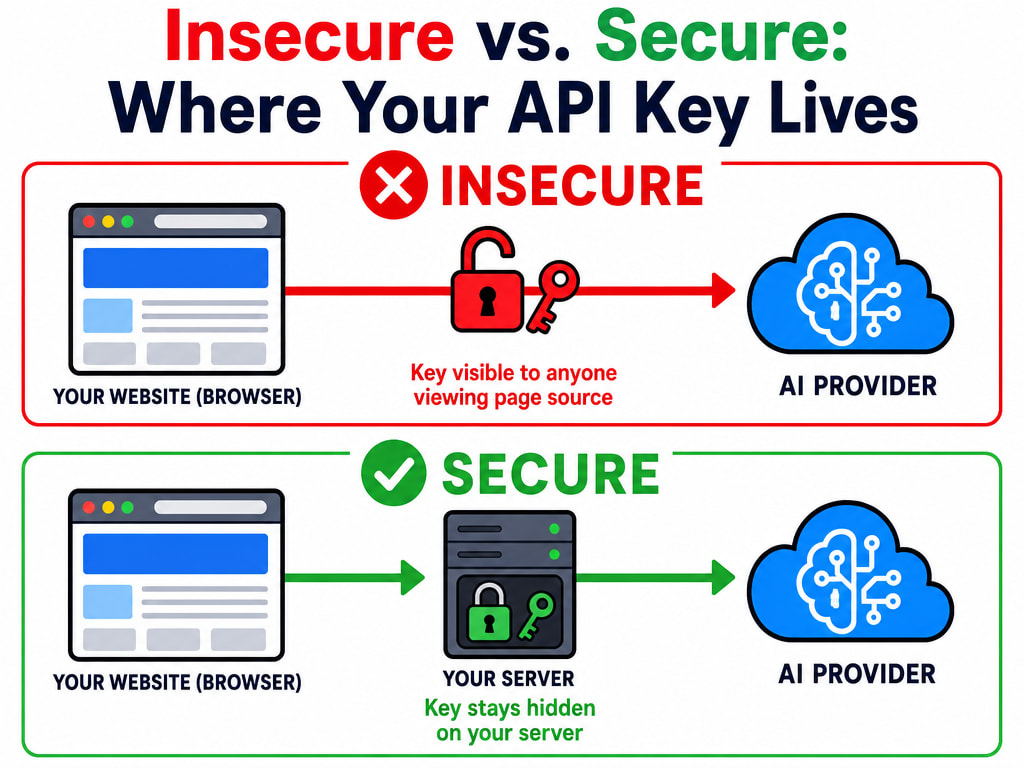
The fix is straightforward: your frontend calls a small script on your own server, and only that server-side script holds the real API key. Here's the same feature done safely in PHP:
<?php
header('Content-Type: application/json');

$data = json_decode(file_get_contents('php://input'), true);
$userMessage = htmlspecialchars($data['message'] ?? '');

$apiKey = 'YOUR_KEY_HERE'; // Safe — users never see this file's contents

$payload = json_encode([
  'model' => 'gpt-4o-mini',
  'messages' => [
    ['role' => 'system', 'content' => 'You are a helpful assistant.'],
    ['role' => 'user', 'content' => $userMessage],
  ],
  'max_tokens' => 300,
]);

$ch = curl_init('https://api.openai.com/v1/chat/completions');
curl_setopt($ch, CURLOPT_RETURNTRANSFER, true);
curl_setopt($ch, CURLOPT_POST, true);
curl_setopt($ch, CURLOPT_POSTFIELDS, $payload);
curl_setopt($ch, CURLOPT_HTTPHEADER, [
  'Content-Type: application/json',
  "Authorization: Bearer $apiKey",
]);

echo curl_exec($ch);
The browser only ever talks to your own server. The real key never leaves it. This exact pattern — frontend calls your server, your server calls the AI provider — is how every production AI feature is actually built, regardless of language or framework.
You've now built a real AI feature the safe, professional way. The next lesson zooms out to the broader web development workflow this fits into.