Layers
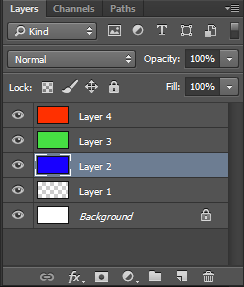
 Figure 9: Layer palette
Layers let you organize your work into distinct levels that can be edited and viewed as individual units. Every Photoshop CC 2015 document contains at least one layer. Creating multiple layers lets you easily control how your artwork is printed, displayed, and edited. You will use the Layers palette (Figure 9) often while creating a document, so it is crucial to understand what it does and how to use it.
- A) Layer Visibility - The eye shows that the selected layer is visible. Click on or off to see or to hide a layer.
- B) Layer Locking Options - Click the checkered square icon to lock Transparency, click the brush icon to lock the Image, click the arrow icon to lock the Position, and click the lock icon to lock all options.
- C) Layer Blending Mode - Deines how the layer’s pixels blend with underlying pixels in the image. By choosing a particular blending mode from the drop-down menu you can create a variety of special effects.
- D) Fill - By typing in a value or dragging the slider you can specify the transparency.
- E) Opacity - By typing in a value or dragging the slider, you can specify the transparency of the entire layer.
- F) Layer Lock -The icon shows when the layer is locked and disappears when it is unlocked. Double-click the icon to unlock the layer.
- G) Layer Options Menu -Click the black triangle to display the following options: New Layer, Duplicate Layer, Delete Layer, Layer Properties, etc. Some of the options are presented as icons at the bottom of the Layers palette.
- H) Link Layers – Can be used to link layers together.
- I) Layer Styles -If a layer has a style, an “F” icon shows at the bottom of the Layers palette. Click the little black triangle to see style options
- J) Layer Mask - Allows you to hide certain parts of the layer, which can then be revealed by using the paint-brush and the white paint color to expose portions of the layer.
- K) Layer Set - This option helps to organize images with multiple layers. Click the icon to create a folder for several layers.
- L) Create New Fill or Adjustment Layer - Have the same opacity and blending mode options as image layers and can be rearranged, deleted, hidden and duplicated in the same manner as image layers. Click the icon and select an option to create a new ill or adjustment layer.
- M) Create New Layer - Click this icon to create a new layer.
- N) Delete Layer - To delete a layer, select a layer in the Layers palette and drag it to the Trash Can icon, or select a layer and click the icon.
If you used other Adobe products, such as Illustrator or InDesign, you should be familiar with the toolbox in Adobe Photoshop CC 2015 as it shares some of the tools from these applications. If you are a new user of Adobe products, you should keep in mind that you might not need to use all of the tools. In this tutorial, only the basic tools will be discussed in-depth.
Some tools in the toolbar have additional “hidden” tools. These tools have small black triangles in the right-hand corner. To view the “hidden” tools, click and hold down on any tool that has a black triangle in the corner.